Pages

Wednesday, September 16, 2015

7 Things You Should Know Before You Get Into Brewing!


So you think you want to get into brewing beer? I totally recommend it, but there are a few things you need to know and do your homework about before making the addictive plunge! The list could be pages and pages deep, but here is a list of the top seven I think are important.

1. Brewing is 90% cleaning and sanitizing, 5% brewing, 4% bottling or kegging 1% Drinking. Take a second to think about that. 

2. A “Starter Kit” with extract is an ideal way to start your home brewing journey. Depending on if you start with a 1 gallon kit or a 5 gallon kit, you will need to have a few things that are not included in typical kits. 
  • A large enough brew kettle. You will need one that can hold and boil 3-5 gallons of water/wort.
  • Powerful enough stove or propane burner for boiling large volumes of water. Anywhere from  3 to 5 gallons of water is typical. You have to account for boil off,  hop / trub / protein coagulation, and the fallout after the boil. 
  • Palatable Drinkable water. You do want good beer don't you? Either a nice water filter or just purchasing a few gallon jugs of reverse-osmosis water.  

3. Brewing a batch (depending on size and efficacy) can take anywhere from 2 hours to 6 hours. Shorter times are estimated for one gallon extract batches while longer times are needed for all grain brewing. 

4. Yeast is your friend! Your kit should have come with some yeast. If not, you will need to get some brewing yeast before you can make beer. (Don’t use bread yeast.)Yeast is alive and needs to be treated with some respect. Before you brew, its recommended to keep it in the refrigerator and limit how long it sits. The longer it sit hinders the health and effectiveness of the yeast. On brew day, take it out of the fridge a few hours before it is going to be pitched (put into the wort to make beer). 

5. You will need some ice and a big enough sink or bathtub to place the boiling pot of wort into. After the boil, it is important to bring the temperature below 100 degrees as quick as you can. Some advanced brewers typically use a wort chiller or chiller plate, but since this might be your first time, a good cold bath and a little patience will go a long way. 

6. Brewing can get expensive. Not really the ingredients, but the equipment. A Basic set up can $300 to an elaborate set up for Thousands of dollars. The nice thing is you can add as you go and upgrade as you see fit. The value of the equipment seems to keep is value, so worst case, you could sell it to someone else looking to brew. Either way, you have been warned!  

7.  While it can be a little overwhelming, brewing beer is not that hard.  It can be as simple or as technical as you want it to be.  Realize that brewing was done several years prior to todays science. Think of it like brewing tea or coffee, just a lot more cleaning and sanitizing! Once you make the jump though... you might be hooked. Brewing can be very addictive!  

Feel free to share these tips with someone you know that might want to enter the beer brewing world. Thanks for reading.

Cheers!
Jimmy Batte 

    BatteCave Brewing Company


    Assistant Brewer Millie cleaning a fermenter
    The brewing community is a pretty unique community. It’s pretty laid back and everyone is willing to share there knowledge, insight, tools, and even a yeast strain when it comes down to it. Of course there are a few bad apples or exceptions but grossly, it’s a great community to be a part of. 

    My wife and daughter got me to take the plunge into the home brewing world a few years ago. They purchased a home brewing kit as a Fathers Day gift and I haven't looked back sense. After diving head first into this great hobby/profession (for some), several questions arose. Not far behind the questions were a myriad answers. Some answers the complete opposite of others but seem to get the same or better results. Thats the other nice thing about brewing, having options that work best and efficiently for you and your brewhouse setup. 

    My goal is not to re-invent the wheel but to share some knowledge in some short and sweet (not too scientific) post. Hopefully it can better serve the newbies as they enter this fun hobby or as a refresher to some that might be mash paddle deep already.

    Cheers!

    Family Update 2015!


    Getting an opportunity to get back to blogging. As you can see it's been a little while... too long in fact. I'll be posting more consistently as we head into the Fall of 2015. Look forward to sharing what we've done and what we're up to now.

    On the Docket


    • My wife and I completed  T25 (Alpha, Beta, and Gamma) - Will be posting our review, tips, survival guide, and pics included. 
    • I started brewing beer over a year ago.. yay! Will be posting a good bit in regards to this venture.
    • Our little girl is three (time is flying!) She's into gymnastics and is our whole world! Will making some post as she has her own YouTube Channel (Millie's World).
    • My wife, Lauren is a school teacher (Elementry Edu. 3rd grade). She has developed The Handout Factory that helps teachers with educational materials ("handouts") to simply their lesson-planning,  teaching, and engage the students with a fun learning environment. She is an avid "Whole Brain" teacher. She contributes to Teachers Pay Teachers consistently and specializes in South Carolina History / Social Studies. Will provide a link to her spot on the web as soon as it's ready. 
    • Photography... I am still active in the photog community but I am not as social since ceasing the business. Will continue to share things on here however. 
    • Food... yeah, we still love food! Will continue to post some of the things we make and devour routinely! 
    • Periscope - Just downloaded this fun app and will be broadcasting some things as we go! Grab it if you haven't already!
    • And much more... consistently! 


    Cheers & Thanks for reading!

    @Batteman87

    Monday, June 9, 2014

    Ribs

    Yum!

    Ingredients 
    • 3 lbs pork back ribs
    • 1 (8 ounce) jar honey
    • 1 teaspoon paprika
    • 1 teaspoon chili powder
    • 1/2 teaspoon garlic powder
    • 2 tablespoons Old Bay Seasoning
    • 1/2 teaspoon onion powder
    • 1/4 teaspoon celery salt
    • 1/2 cup dark brown sugar
    • 1/4 teaspoon fresh ground pepper
    • 1 medium onion, grated or finely chopped
    • 12 ounces barbecue sauce of your choice. I use Sonny's 
    • 1 Tsp white sugar

    Preheat oven to 325°. 
    Remove membrane from the back of the ribs. Optional, but I sometimes cut the ribs apart prior to cooking; This makes for easier serving. Place all ingredients together in large roasting pan. 
    Mix together listed ingredients making a paste rub. Coat ribs with this paste. Spread ribs out evenly on bottom of pan and cover lightly with foil.Bake at 325° degrees for approximately 3 hours. Turning occasionally and basting with the goodness that is in the pan.While you don't have to, I prefer to finish these ribs on the grill. I fire up my charcoal about 30 minutes before I take them out of the oven. I place them on the hot part of the grill for direct heat for a minute or so then put them on the cool side / indirect heat for ~5 minutes then flip for another 5 minutes. Remove them from the grill and cover with foil and let them rest for 10 to 15 minutes before serving. These ribs are also great finished on the grill for a few minutes on each side.


    Tuesday, November 19, 2013

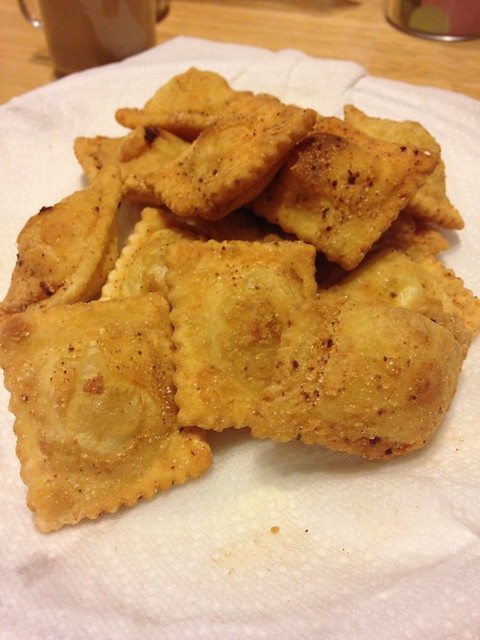
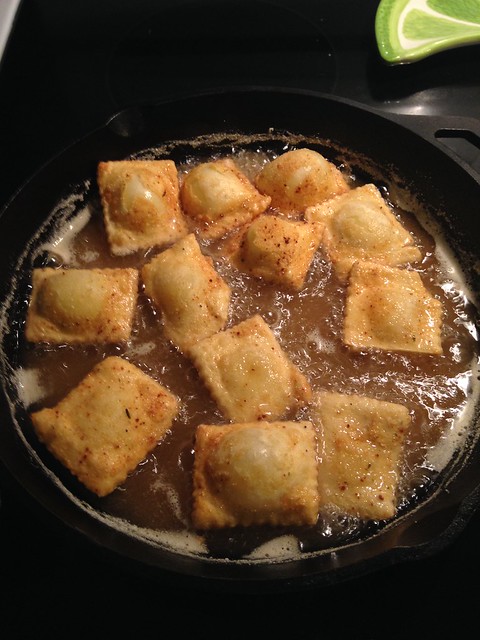
    Fried Ravioli

    Untitled

    We were in clean up and de-clutter mode at out house the other day. Going through the fridge and freezer we find items that need to be used before that expire. This round was some frozen cheese ravioli and some pasta sauce. My wife and I have had the fried ravioli from restaurants and so we  decided to try it at home. Here is our thrown together fried cheese ravioli recipe that turned out pretty darn good!

    Fried Cheese Ravioli  
    Ingredients
    Frozen Ravioli - thawed (we had cheese but can use any). We let it sit out on the counter then finish in the fridge as it started to soften.
    1 Egg beaten
    1 Tbsp Water
    1 C All purpose flour
    1 C Yellow Cornmeal
    1 tsp Italian seasoning
    1/3 C grated parmesan cheese
    Salt - to taste
    Pepper - to taste
    Oil - enough for frying, we used Wesson oil in a cast iron skillet (about 1/2" worth)

    Directions
    Heat oil to frying temp.
    Beat eat and add 1 Tbsp water
    Combine and mix flour, cornmeal, italian seasoning, parmesan cheese, salt, and pepper.
    Take thawed ravioli, dip into egg and place into flour mixture. (I did about 8 at a time since that was the size of the container I used.) Once your oil is ready for frying (test with a small pinch of flour, if it bubbles, its ready. If it doesn't, it's not.... that simple). Retrieve your coated ravioli shaking off excess back into the flour. Slowly place into the hot oil with tongs or a slotted spoon. Allow them to fry for 2 to 3 minutes on each side. (NOTE: As they cook, they will "puff up") Once they have reached a light golden color and have "puffed" some. Remove from oil and place on plate that has been lined with a paper towel. Cover with tinfoil until ready to serve. Serve as as you can.

    Untitled

    Heat some marinara for a dipping sauce. You can also use ranch dressing for a dip.

    Hope you and yours enjoy!
    As always, thanks for looking.
    @Batteman87
    Related Posts Plugin for WordPress, Blogger...